The Eye upon Skyline,
The Beauty beyond Infinity
About Aerial Photography
2.1 History and Development
The history of aerial photography started long before in the 1860s, already there were aerial photographs. During this time, airplanes weren’t even invented yet. The photo at right with clear shape of buildings was shot on an air balloon by photographer James Wallace Black and air balloon expert Samuel Archer King. However, the original idea of aerial photography came along with kites. The first photographer that came up with this idea was George R. Lawrence in 1900s. But since he used an immense camera, one kite could not sustain the weight of the camera, so he failed. Another idea George had was to use the air balloon, but the balloon he ride on fell from the height of 200 feet in the sky, which truly terrified him. After trying multiple times, George finally discovered that 9 to 17 kites is the most successful to bring the camera onto the height of 2000 feet. Although he wasn’t the first person who tried to shoot aerial photos, his adventurous ideas still influenced other photographers' thoughts.

(1) Vertical-Gliding Filming
The vertical gliding filming is used to create a special effect, starting from a blur to a clear image in a sudden. This technique can make audiences feel they are flying up into the sky. To create such scene, the photographer needs to adjust the lens of the camera so it faces the ground directly. Then, the camera will rise to a height in a short amount of time, simulating taking off. To make this effect even more realistic, the camera must be both steady and non-stopping. This skill is best for observing huge patterns or small details.

(2) Pivot-Steering Filming
The pivot steering filming is a special skill that spins the audience's perspectives and minds. After setting the camera to a certain height and location, the lens face down. Then, the camera starts shooting while rotating, giving it a spinning effect. The purpose of this skill isn’t to shot a clear image, but to let the audience know what is the entire environment of the scene. Therefore, the rotation of the camera must not be too fast too. During shooting, other object can be added into the screen for special effects, but its main target must stay in the center of the screen.

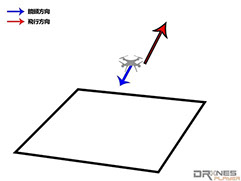
(3) Backwards-Panoramas Filming
This shooting technique zooms out the audience's perspectives of one view. This method is similar with the first one, vertical gliding filming, but the only difference is that this one is much slower, so the audiences can carefully enjoy the view. Before letting the camera take off, the lens needs to be adjusted to the direction facing the photographer, about 30 degrees. After take-off, the camera will gradually rise and fly backward, away from the photographer. Some photographers will also make the camera shift backwards suddenly, making the audiences feel they are "pushed away."
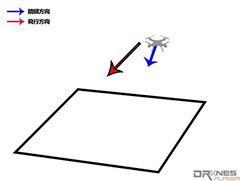
(4) Speed-Controlling Filming
This technique let the camera stay in a certain height, and change the speed of the camera irrationally. Comparing to other methods, this technique is way easier. The only thing the photographer need to do is to control the speed of the camera. After taking off, the camera will rise to its targeted height, and the lens will face down a little. Then when the camera starts recording, the camera will fly horizontally in different speeds. The characteristic of speed-controlling filming is that the photographer can change the speed of the camera randomly to create different effects. For example, if the main object of the scene is the detail of target, then the photographer should move the camera in a slower speed; if the purpose of the scene is to describe how huge is the target, then the camera should move in a higher speed and a lower height to create speedy effect.
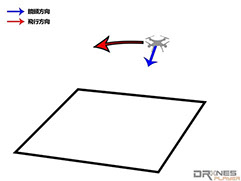
(5) Horizontal Filming
The horizontal filming skill is to spin the camera while it is moving left or right. The photographer needs to fly the camera to suitable height. The higher the height, the wider the view will be. One advantage of this method is that it is easy and smooth. If the camera moves right, then the camera should rotate leftwards, vise versa. In addtion, the speed of the rotation cannot be too fast, so it will be smooth and nice.
(6) Subject-Surrounding Filming
Subject surrounding filming is a technique that orbits the target. In other word, this skill will make audiences look at every perspective of an object. Although this skill is similar to horizontal filming, most photographers call this method the upgraded version of horizontal filming. Many professional photographers also recommend people to practice this skill in huge square in order to master this technique. As the photographer gets familiar with orbiting, he/she can start practicing in smaller circles. This method is widely used to create stunning effects, especially in movies.

(7) Subject-Tracking Filming
This shooting technique is the hardest among all the methods mentioned above, thus the skill requirement is relatively high. This filming skill relies on the change of the angle of the lens and the height of the camera. The hard part of this technique is that its target is a moving one. The photographers will need to create different effects in different angles while following the moving target. However, the photographer can do anything to the camera as long as it follows, or "track," the target. There are no other requirements on this method. This technique is often used to test how skillful one photographer is.
2.3 Hardware Equipments of Aerial Photography
After comparing our surveys, we found out that about 90 percent of people have heard about Aerial Photography. However, only about 63 percent of them recognize the equipments an aerial photographer will need to use. And barely a few knows how complicated it could be. Most people think Aerial filming is so easy that you only need a camera and a remote control aircraft. Indeed, it seems easy. But probably only the professionals can actually "master" this skill. To produce good aerial photographing scenes, more equipments are needed rather than just camera. Hence, let us introduce the three main kinds of remote control aircrafts:
(1) Fixed-Wing Aircraft
Fixed-Wing aircrafts are like the planes we see at the airports. Its max flying time and distance mostly depends on the flight conditions and which type of aircraft it is. The flying distance can vary from 50 to a few thousand kilometers. However, the fixed-wing aircrafts can’t stay long in a high altitude. Its flying speed is also considered quite fast (About 200 km/hr), so it can’t stay long in a fixed point. In conclusion, it can fly longer and further than most aircrafts. But due to its size limit, fixed-wing aircraft is more suitable for reconnaissance and taking photographs.
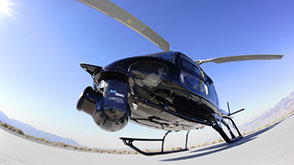
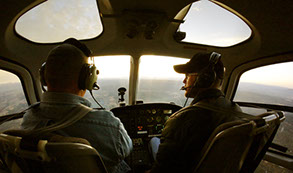
(2) Helicopter
Helicopter’s max flight time and distance is shorter than the fixed-wing aircrafts. Based on the type of the helicopter, the max flight height can vary from 500 meter to 4000 meter, the max distance can reach about 600 kilometer. Helicopters are able to stay in a fixed place and move slowly. Because of their less max flying range and height, most of them don’t fly higher than troposphere. Therefore, the helicopter can be affected by air current and weather more easily, and more skill is required than flying fixed-wing aircrafts. Helicopters is suitable for video clips, or commercial and movies that required strong general appearance and intense movements.
The most advanced equipment with the function of target-tracking is “Cineflex Elite”, which is also used in Director Chi's documentaries (Official website: http://www.aerialfilmworks.com/). This camera has powerful feature of following either a moving or stopping target, and it also contains a camera stabilizer to overcome the shakiness that the helicopters cause. Therefore, the resolution of its video is higher than other cameras. Because of its special feature and suitability, the Cineflex Elite has started to become more popular.
(3) Multi-Axis Aircraft
The flying method of multi-axis aircraft is very similar to the helicopters, but its isn’t as fast as the helicopter. Some more electrical controller and sensors are required for this type of aircraft. For example, GPS, air pressure sensor, height sensor, and signal sender can deliver the screen back to the photographer so he/she can know the direction of the camera. One disadavantage is that the electrical controllers are expensive and intractable, however as long as the photographing area doesn’t encounter strong winds, then the controllers would be safe and fine. For its advantage, although the multi-axis aircraft costs more, it can achieve all of what the helicopter can do. Each of these three kinds of aircraft have different characteristics, so the photographer can decide which one to use for their conveninece.
ost people cannot quickly master aerial photography because they lack experiences of controlling and flying the camera. The equipment and technology weren't that advanced few years before, thus the cameras could only do simple tasks. The operators before could not know where is the camera and where the camera is facing to, which made it hard to keep the camera steady during the dangerous flight. The lack of supervision on the camera caused plenty of "camera-crushes" during that time. This didn't only happen to the rookies, but the experienced, too. A lot of people who study hard in aerial photography realize, that controlling the camera may seem easy, but mastering all the controls is real tough. The operators need to adjust the camera to the best angle first, then they will have to consider the other elements such as the environment, light, distance, weather, route, and people in the area. Since many people misconceived the difficulty of doing aerial photography, they often fail in their first try, and therefore give up swiftly in fear.
Nowadays, aerial photography are much easier than before because the technology improved a lot, and more convenient equipments are invented, too. Unexperienced people can shoot simple and high quality videos by simply moving their fingers. High-tech objects such as GPS, OSD, air pressure sensor, height sensor, and magnetometer can let the photographer know all the information about their cameras. By capturing data from the cameras after several flights, the photographer can improve their flying techniques quickly and easily.
Technology developed so fast in a sudden, that it made the photographers overcome so many difficulties they had faced before. Now they can produce works with higher quality and with higher efficiency, and finally, "master aerial photography."
M
